Pages

Pumpkin Spice Macarons with Pumpkin Cheesecake Buttercream Filling

Monday, October 26, 2015


I am a huge fan of Pumpkin. I know many say that it's a marketing ploy and that the PSL at Starbucks is mostly pumpkin syrup (aka sugar), but despite all of this I couldn't resist creating some Pumpkin Spice French Macarons for all of you!

French Macaron Baking Supplies:
Electric mixer (hand/stand mixer will do as long as you have a whisk and regular beater attachments)
Good heavy/thick baking sheets that won't warp in the oven
2-3 Silicone macaron baking sheets (I got these ones from Amazon and love them!)
Silicone spatula
Hand whisk
Kitchen scale
Set of mixing bowls
Sieve or flour sifter
Pastry bag and round tip with attachment

Shells Baking ingredients: 
100g Almond flour (I prefer Mama's Almond Flour Blend. It's much finer than other almond flour/meal)
200g Powdered/confectioner's sugar
40g plain granulated sugar
1/4 teaspoon of Pumpkin Spice
3 egg whites at room temperature (approximately 100g)
2 drops of Orange Gel Food Coloring (optional)

Pumpkin Cheesecake Buttercream ingredients:
1 stick of room temp butter
1 teaspoon vanilla (clear vanilla is best)
1/4 teaspoon ground cinnamon
1/8 teaspoon salt
1/4 cup canned pumpkin
3 c. powdered sugar
1 and 1/2 8oz packages of room temp Philadelphia Cream Cheese


Let's begin!

If I forgot to leave my eggs out overnight, I start by prepping my eggs in a glass of warm water and leaving it on the counter. 

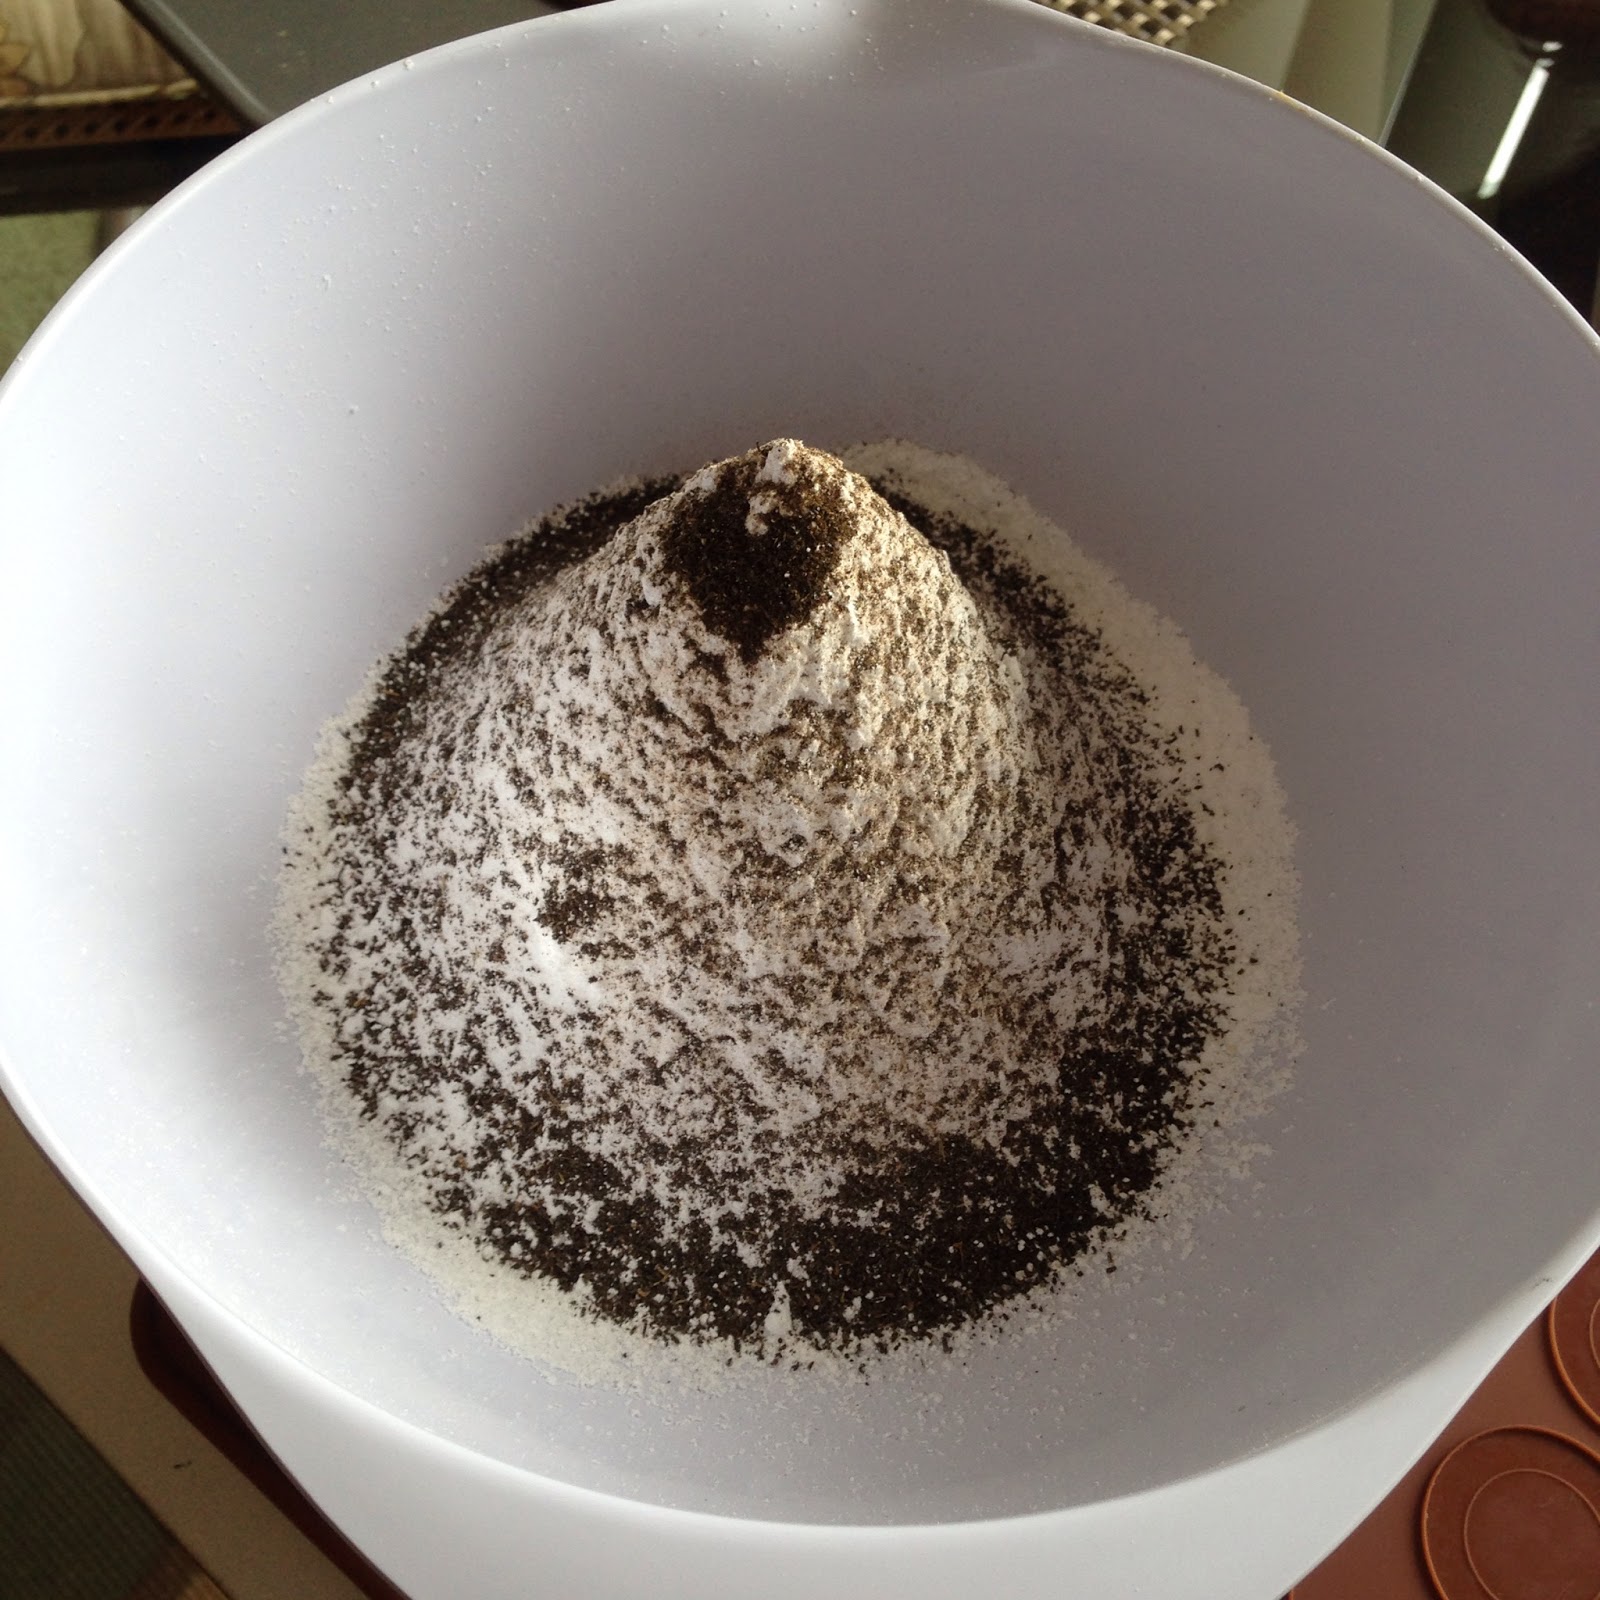
 Then I use my flour sifter to sieve the measured almond flour and powdered sugar together. Next, I add in the 1/4 teaspoon of pumpkin spice and hand whisk the dry ingredients together. 

Set the dry mixture aside and you can separate the egg whites, add the pinch of salt and begin whipping. Once you get a foamy texture, start adding in the 40g of granulated sugar. I usually do this in 3 installments and whip the whites into a meringue. This will take a while, but be careful not to over whip or your macarons will be dry and crack. Just keep whipping and checking until you have slightly stiff glossy peaks. Right before they are totally done, I add in a couple drops of food coloring. This step is optional, but I like the look of orange shells with the pale orange pumpkin cheesecake buttercream.


Once your meringue is finished, put aside your electric whisk and get out your spatula. You will gradually begin to fold in the dry mixture into your meringue. It's important to add this incrementally and mix in each portion well before adding another. I usually do this in 3 portions, but again it is important not to OVER mix in this stage as well. This is how it looks when it has to come together.


This is what you want... smooth slow flowing lava texture. A good test is to check the consistency of the batter by lifting up your spatula. Does the batter flow slowly in ribbons or in chunky globs? You want ribbons :)

Finally, it's time get out your trusty pastry bag and round tip. I like to prop mine up in a tall flower vase so I can pour the batter into the bag with one hand holding the bowl and the other scraping the sides with the spatula. 

All that's left is place the silicone molds on your baking sheets and pipe into the molds. Tap the sheet on your counter to let any air bubbles loose and let these babies dry for 30 minutes.


There's something to gratifying to me to fill these little circular molds and see their beautiful rows of perfection...


 Most standard French macaron recipes will tell you to bake them at 325 deg F for 10 minutes, but you should take into consideration if your oven runs hotter/colder than others. I happen to know that mine runs hot, so I set the temp to 315 deg F for the first batch, and for the 2nd and 3rd trays I put a wooden spoon handle in the oven door. I find this method works best for me, because my 2nd and 3rd batches were repeatedly coming out cracked from my oven being on longer and therefore too hot. I mean just the whole sheet of them would be cracked! Horrible!!! The wooden spoon method has proven itself several times over to me, so now I never bake my subsequent batches without it. 

While the shells are baking, I usually start my Pumpkin Cheesecake Buttercream Filling:

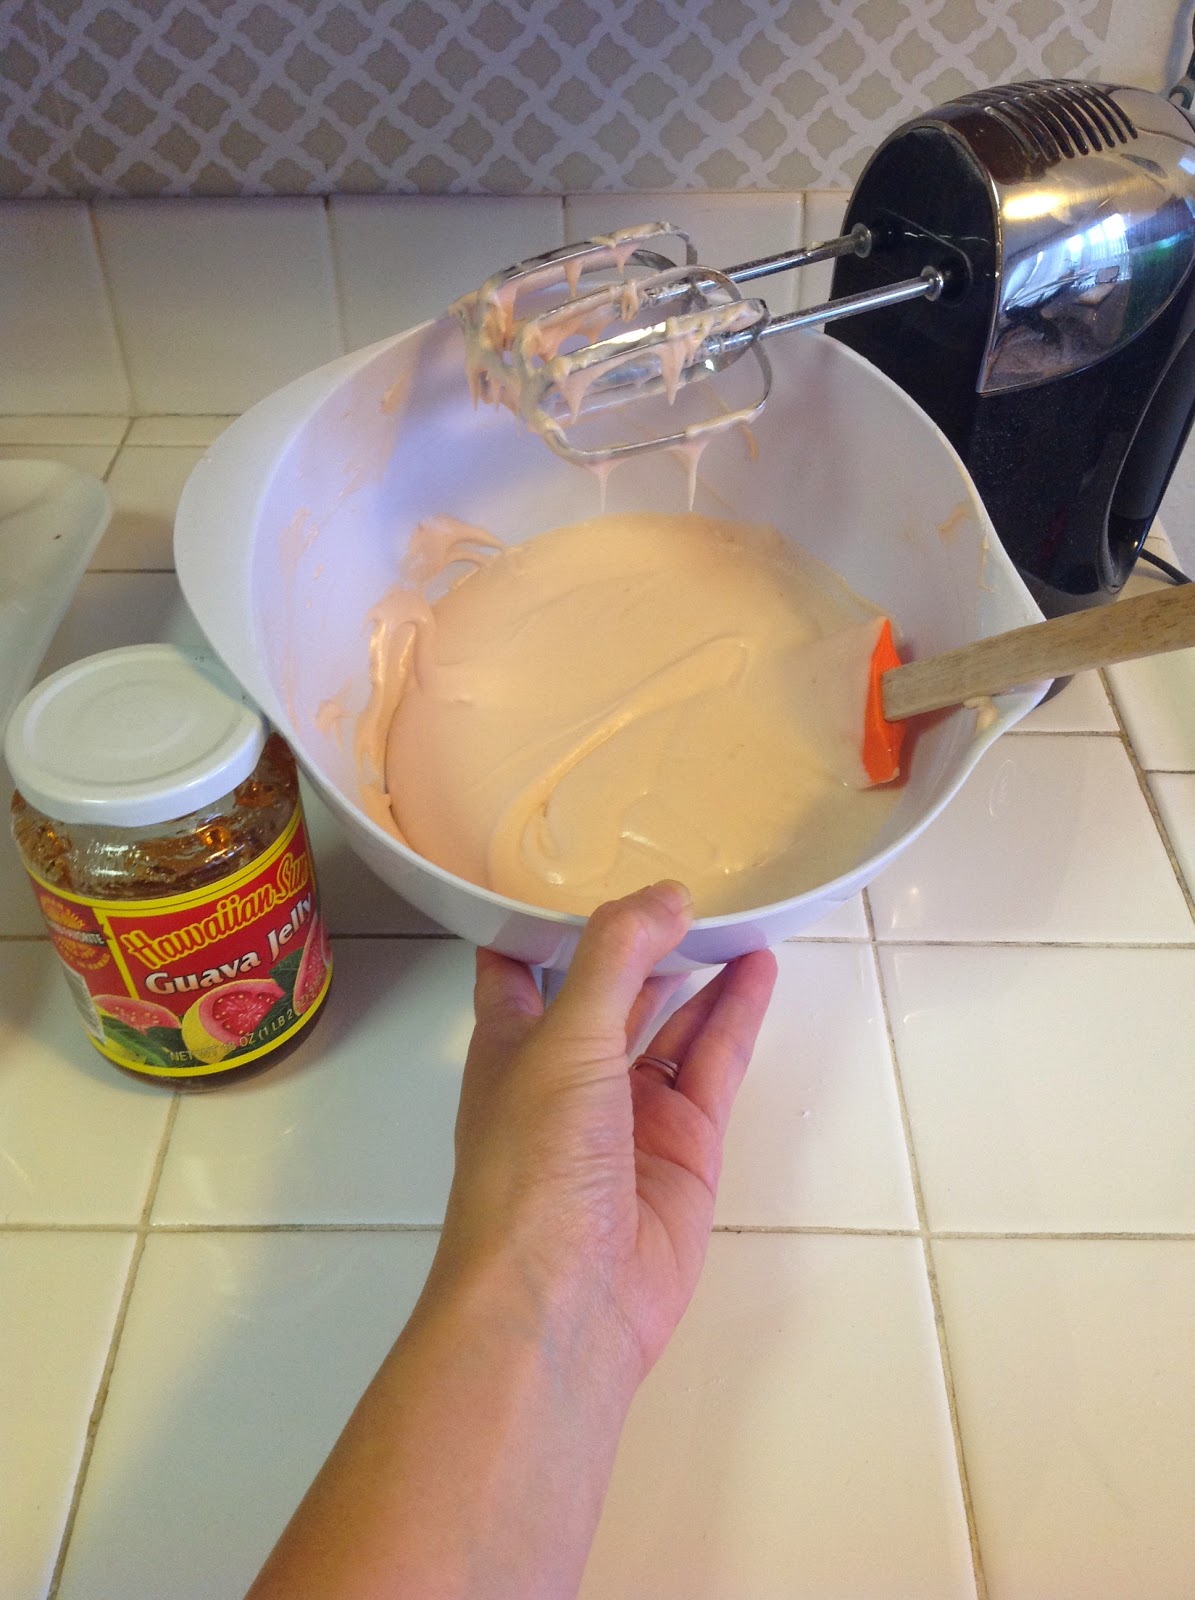
Using my stand mixer, I beat the room temperature butter and cream cheese together until fluffy (about 2 minutes). Then on a lower speed, start adding in the powdered sugar in increments. Keep adding bit by bit until all of it is incorporated.
Lastly, add in the canned pumpkin and the salt and spices. That's it, you're done! This usually makes more filling than I need for one batch of macarons, but it keeps well in a mason jar in my fridge for weeks until I can make another pumpkin macaron batch.

Back to the shells...
Once the cookies are 100% cooled, you can start to carefully peel them off the silicone mats. I have tried to jump the gun and peel them off when they're mostly cooled and found the cookies don't come off the mat. Instead the tops pull off and you ruin the beautiful macaron feet. Just BE PATIENT! I know it's hard!


Divide your cookie shells evenly into two groups: tops and bottoms and beginning pipping the buttercream. Finally, sandwich them together and voila! Now technically, I should warn you that they need to be refrigerated overnight and then brought to room temperature before tasting, but let's be real... Everybody tastes the first one, right?!


Again, I can't explain to you the layers of flavor one experiences when you bite into these pillows of heaven, so I strongly encourage you all to give it a try. If you make your own batch, please share with me below or by using the hashtag #blissfullyevercrafter. I'd love to see your creations!

Blissfully Ever Crafting,

Jennifer Lynn

Earl Grey Tea Macarons

Sunday, August 9, 2015


My friend Angela has been a fan of Earl Grey flavored desserts for a while. Personally, I have never been a tea girl and always preferred coffee, but I relished the challenge to create some Earl Grey Tea macarons for my friend. Little did I know, that recipe I came up with would be such an amazing bouquet of flavors in my mouth! The tea combined with the honey buttercream I whipped up created this depth of flavor that I honestly can't even describe. All I have to say is that every person who tried them (friends and family alike) all agreed it was their new favorite flavor! Without further adieu, here's the recipe:

French Macaron Baking Supplies:
Electric mixer (hand/stand mixer will do as long as you have a whisk and regular beater attachments)
Good heavy/thick baking sheets that won't warp in the oven
2-3 Silicone macaron baking sheets (I got these ones from Amazon and love them!)
Silicone spatula
Hand whisk
Kitchen scale
Set of mixing bowls
Sieve or flour sifter
Pastry bag and round tip with attachment
Mortar and Pestle

Shells Baking ingredients: 
100g Almond flour (I prefer Mama's Almond Flour Blend. It's much finer than other almond flour/meal)
200g Powdered/confectioner's sugar
40g plain granulated sugar
2 bags of Early Grey Tea (I prefer the loose tea bags from Tazo)
3 egg whites at room temperature (approximately 100g)

Honey Buttercream ingredients:
1 and 1/3 stick of room temp butter
1 teaspoon vanilla (clear vanilla is best)
1 tablespoon water
1/4 cup honey (QUALITY local honey here is key for optimal flavor! Don't buy the cheap stuff)
1/3 c. white granulated sugar
2 egg yolks (save these from the eggs used for shells)


Let's begin!

If I forgot to leave my eggs out overnight, I start by prepping my eggs in a glass of warm water and leaving it on the counter. 
Then I use my mortar and pestle to finely grind the contents of two Earl Grey tea bags and set it aside. 


 Then I use my flour sifter to sieve the measured almond flour and powdered sugar together. Next, I sift in the ground tea and hand whisk the dry mixture together. 


Set the dry mixture aside and you can separate the egg whites, add the pinch of salt and begin whipping. Once you get a foamy texture, start adding in the 40g of granulated sugar. I usually do this in 3 installments and whip the whites into a meringue. This will take a while, but be careful not to over whip or your macarons will be dry and crack. Just keep whipping and checking until you have slightly stiff glossy peaks.

Once your meringue is finished, put aside your electric whisk and get out your spatula. You will gradually begin to fold in the dry mixture into your meringue. It's important to add this incrementally and mix in each portion well before adding another. I usually do this in 3 portions, but again it is important not to OVER mix in this stage as well. This is how it looks when it has to come together.

This is what you want... smooth slow flowing lava texture. A good test is to check the consistency of the batter by lifting up your spatula. Does the batter flow slowly in ribbons or in chunky globs? You want ribbons :)

Finally, it's time get out your trusty pastry bag and round tip. I like to prop mine up in a tall flower vase so I can pour the batter into the bag with one hand holding the bowl and the other scraping the sides with the spatula. 


All that's left is place the silicone molds on your baking sheets and pipe into the molds. Tap the sheet on your counter to let any air bubbles loose and let these babies dry for 30 minutes.


There's something to gratifying to me to fill these little circular molds and see their beautiful rows of perfection...


 Most standard French macaron recipes will tell you to bake them at 325 deg F for 10 minutes, but you should take into consideration if your oven runs hotter/colder than others. I happen to know that mine runs hot, so I set the temp to 315 deg F for the first batch, and for the 2nd and 3rd trays I put a wooden spoon handle in the oven door. I find this method works best for me, because my 2nd and 3rd batches were repeatedly coming out cracked from my oven being on longer and therefore too hot. I mean just the whole sheet of them would be cracked! Horrible!!! The wooden spoon method has proven itself several times over to me, so now I never bake my subsequent batches without it. 

While the shells are baking, I usually start my Honey Buttercream Filling:

Using my stand mixer, I beat the 2 egg yolks until they are a pale yellow color. Then using a small saucepan on medium heat, add together the sugar, honey, and water and let sit until the heat naturally helps them combine. Don't mix! Once it comes together, I remove it from the heat immediately. 
Next, I slowly drizzle in the honey mixture down the inner side of the bowl in the stand mixer while the mixer is on with the yolks. I add in the thin stream of hot honey mixture until it is all poured in. Leave on the mixer at a high speed and walk away until the bowl feels closer to warm temperature. It takes about 15 minutes. 
Finally, add in the clear vanilla and the room temp butter one tablespoon at a time until fully incorporated on low speed. 

Once the cookies are 100% cooled, you can start to carefully peel them off the silicone mats. I have tried to jump the gun and peel them off when they're mostly cooled and found the cookies don't come off the mat. Instead the tops pull off and you ruin the beautiful macaron feet. Just BE PATIENT! I know it's hard!

Divide your cookie shells evenly into two groups: tops and bottoms and beginning pipping. Finally, sandwich them together and voila!


Again, I can't explain to you the layers of flavor one experiences when you bite into these pillows of heaven, so I strongly encourage you all to give it a try. If you make your own batch, please share with me below or by using the hashtag #blissfullyevercrafter. I'd love to see your creations!

Blissfully Ever Crafting,

Jennifer Lynn


DIY Bachelorette in Vegas #VillasVegasBatch

Thursday, July 9, 2015


I'm not gonna lie, planning this bachelorette for my cousin Karen has taken over a year of group emails, texts, and phone calls. With Karen living in Boston and myself (her MOH) here in the San Francisco area, deciding on the location alone was a serious group effort. About half of her other bridesmaids live in the East Coast and the other half are scattered around the western part of the country (Texas, Colorado, and me in California). Given that about half of us would have to hop on a plane regardless of the location, we decided as a group that Vegas would be the most fun... and well... cuz it's VEGAS!

I have helped plan three other bachelorettes in the past and only the first one I went to was in Vegas. It was for my dear friend Angela (luv ya Ange!) and we stayed in this beautiful suite on the strip, went to clubs and got bottle service, and even saw Thunder from Down Under... you know the typical bachelorette events. The only problem was that I got sick the evening of the first full day there and truthfully never really recovered. Needless to say, I could definitely do a Vegas bachelorette do-over. 

Being, the matron honor also has a whole new level or responsibilities versus being a BM that gets to go along with the plans. It was up to me to make sure everyone could budget for the trip, coordinate flight times, arrange accommodations, and plan all the events for us to do while we were there. Once all of that (or at least most of it) was accomplished, I got to start working on the really fun parts... the projects!!!!

First order of business was to create an awesome welcome bag/gift tote for the girls to have as a keepsake, but also stock with useful favors to use during the trip. I decided on custom tote bags and tumblers with a small collection of "survival kit" items inside. 

Here's what I put in the survival kit:
Advil packets (from Amazon)
EOS lip balm sets (from Costco)
Metallic temporary tattoos (from Etsy)


Materials for Custom Tumblers:
Glitter Tumblers (from my local Kohl's store... I know right?!
Vinyl and transfer medium for my Silhouette Portrait (from Amazon)
Silhouette Portrait/Cricut/other custom cutting machine

Materials for Custom Tote Bags:
White canvas tote bags (from Amazon)
Striped fabric (mine were the left over runners from the shower!)
Stitch Witchery
Iron & ironing board

Custom Tumblers
I would like to start by saying that I don't  know what I did before my husband bought me my Silhouette machine. I mean, I thought I was crafty before, but dang... I can do so much more now with this thing. Luckily, I found the glitter tumblers at my local Kohl's department store on clearance in the cosmetics section of all places and couldn't be more excited! I paid only $4.80 each for them which was purely amazing since I had been cyber stalking several blank ones online that were at the cheapest $7.00. I snatched up 8 of them right away and then realized that I had no idea how to use my Silhouette to cut vinyl. 

I have used it for paper and fabric, but never to cut vinyl before, but how hard could it be? Well after a few brief YouTube tutorials I busted out my Silhouette machine and laptop and started messing around with the design software. I knew that I to have each girl's name on it and her bachelorette hashtag. To start with I spent a great deal of time selecting a beautiful font for everyone's names and the hashtag. I chose Lavendria which is beautiful and loopy and girly and usually one of my favorites. What I should have done is done a test print of only one name/hashtag before cutting out a huge sheet of these. If I had done a test one first, then I would have realized that pulling the vinyl away from these delicate filigree letters is extremely tedious work. I found myself using my husband's magnifying lamp and the tip of a sewing pin to try and remove the negative space vinyl without ripping the letters clean off... Very frustrating! 

I ended up scrapping that whole first sheet and went back to the drawing board to re-design the names and the hashtag with a thicker and larger font style and size. I settled on the "Channel" font for the names (downloaded it for free from Pinterest) and one that came with my Silhouette program for the hashtag that was cursive like, but much bolder and less loopy. I still had to use the magnifying lamp to remove the negative space from the letters, but it was relatively easy compared to the first trial. Next, I cut to size a piece of the vinyl transfer medium and pressed it onto the word firmly with my scrapper tool. Then, I peeled the words up with the transfer medium and carefully smoothed it onto the tumbler. Press Press Press with the scrapper and then peel off to reveal your beautiful creation! 


Custom Tote Bags
I really loved the wide black and white striped table runners I bought from Etsy for Karen's bridal shower. I mean, weren't they just adorable?! 

Since I had purchased 7 of them and Karen only wanted to keep one, I had 6 others to use at my disposal... and these suckers were long! I quickly pulled up a provided heart graphic on my Silhouette software and changed the settings to cut fabric. Cut out a square of the runner to fit into the machine and in no time churned out 8 fabric hearts. Next, just busted out my Stitch Witchery and ironed one onto the front of each canvas tote. Lastly, I used my trusty Silhouette to cut out the initials of each girl using the iron-on pink glitter adhesive material. It was so simple to do, but I think it looks so chic and will be versatile for future use as well. 


Put it all together:

Lastly, myself a few of the other bridesmaids traveled to Vegas a few hours before the Bride and her other BM's flight landed. We were able to do early check in at the Paris Hotel and even got the staff to help by ordering a cake, champagne, and balloons delivered to the room. All that was left to do when we arrived was to decorate the room with ribbons and I hung the banner I made for her ("Karen's Last Fling Before the Ring"). I positioned the totes with their goodies inside on the two beds in Karen's room and when she arrived it was a huge surprise! I have to admit that I couldn't have it done without the help of Sarah, Keisha, and Danielle who arrived early with me helped decorate the room. Here's the few pics that we remembered to take before the Bride arrived:


And for your viewing pleasure, here are a few more pics of the beautiful Bride and myself on our first night out on the town.

Love ya Ren!


Coffee French Macarons with Nutella Buttercream Filling

Sunday, June 14, 2015


I have to say that making French macarons has become an obsession of mine. I just can't get enough of these delicious little cookies. What really gets me is the texture... they're outside shell has a slight crunch as you bite in, but the middle is the perfect chewy and gooey texture where the soft middle of the shells meets the yummy buttercream filling. Perfection!!!

Experimenting with different flavor combinations is my new found favorite hobby, and hands down my new favorite flavor is this this one... Coffee shells with Nutella buttercream filling. This shouldn't really come as a surprise since my husband and I both love drinking coffee, but there's something about coffee and hazelnut that I have always loved together. In fact, the cup of coffee that my husband kindly makes for me every morning has hazelnut creamer in it! Go figure!

The secret ingredient in these babies is finely ground instant espresso powder. I bought mine at target, but didn't skimp on quality. There were several different brands available in the coffee section and my husband even questioned why I needed to select the most expensive option, but I could tell just by looking in the jar that the finer the powder the better the shells would look and taste... and I was right. 


French Macaron Baking Supplies:
Electric mixer (hand/stand mixer will do as long as you have a whisk and regular beater attachments)
Good heavy/thick baking sheets that won't warp in the oven
2-3 Silicone macaron baking sheets (I got these ones from Amazon and love them!)
Silicone spatula
Hand whisk
Kitchen scale
Set of mixing bowls
Sieve or flour sifter
Pastry bag and round tip with attachment

Shells Baking ingredients: 
100g Almond flour (I prefer Mama's Almond Flour Blend. It's much finer than other almond flour/meal)
200g Powdered/confectioner's sugar
40g plain granulated sugar
2 tablespoons fine instant espresso powder
3 egg whites at room temperature (approximately 100g)

Nutella Buttercream ingredients:
3/4 cup of butter
1/2 cup of Nutella
Pinch of salt
3/4 cup of confectioners' sugar
FYI- this will yield a large amount of filling and you will have extra. I recommend saving it in a Ziploc in your fridge for your next batch of macarons. Just work the filling in the bag with your hands to warm it up or bring it to room temp before you'll need it next.

Let's begin!

I always start by using my flour sifter to sieve the measured almond flour and powdered sugar together. Next, I whisked in the 2T of instant espresso powder. Set the powder mixture aside and you can separate the egg whites, add the pinch of salt and begin whipping. 


Once you get a foamy texture, start adding in the 40g of granulated sugar. I usually do this in 3 installments and whip the whites into a meringue. This will take a while, but be careful not to over whip or your macarons will be dry and crack. Just keep whipping and checking until you have slightly stiff glossy peaks [shown below].


Once your meringue is finished, put aside your electric whisk and get out your spatula. You will gradually begin to fold in the dry mixture into your meringue. It's important to add this incrementally and mix in each portion well before adding another. I usually do this in 3 portions, but again it is important not to OVER mix in this stage as well. This is how it looks when it starts to come together.

And this is how it looks when I'm done. This is what you want... smooth slow flowing lava texture. A good test is to check the consistency of the batter by lifting up your spatula. Does the batter flow slowly in ribbons or in chunky globs? You want ribbons :)

Finally, it's time get out your trusty pastry bag and round tip. I like to prop mine up in a tall flower vase so I can pour the batter into the bag with one hand holding the bowl and the other scraping the sides with the spatula. All that's left is place the silicone molds on your baking sheets and pipe into the molds. 

Tap the sheet on your counter to let any air bubbles loose and let these babies dry for 30 minutes. 

***That reminds me... don't try to make this on a humid or rainy day. The shells won't dry correctly and it will not work! You can try countering the weather by letting them air dry for an hour or more, but I recommend just waiting until the weather is less ideal.***

Most standard French macaron recipes will tell you to bake them at 325 deg F for 10 minutes, but you should take into consideration if your oven runs hotter/colder than others. I happen to know that mine runs hot, so I set the temp to 315 deg F for the first batch, and for the 2nd and 3rd trays I put a wooden spoon handle in the oven door. I find this method works best for me, because my 2nd and 3rd batches were repeatedly coming out cracked from my oven being on longer and therefore too hot. I mean just the whole sheet of them would be cracked! Horrible!!! The wooden spoon method has proven itself several times over to me, so now I never bake my subsequent batches without it. 

Once the cookies are 100% cooled, you can start to carefully peel them off the silicone mats. I have accidentally under baked mine before and found out during this phase when the cookies don't come off the mat. Instead the tops pull off and you ruin the beautiful macaron feet. If this happens to you, what I do is put the cookies back on the baking sheet and back in the oven for a few more minutes at a lower temp. For me, that's about 300-305 deg F. Keep a close eye on them though, because the last thing you want is for them to burn.

Divide your cookie shells evenly into two groups: tops and bottoms and beginning pipping. 

Once you have half of all your shells filled, begin putting the shells together and press lightly to make sure they're secure. Most recipes then say to store them in the fridge overnight before tasting, but to be honest I always eat the rejects (cracked ones) right away and store the pretty ones for guests in the fridge :)


And there you have it, my favorite macaron flavor du jour! Hope you give them a try and if you do leave me a comment below or use #blissfullyevercrafter.

Thanks guys!
Blissfully Ever Crafting,
Jennifer Lynn


Green Tea Guava Buttercream Macarons

Tuesday, May 12, 2015


So frankly, these are just as delicious as they look. It all started with getting this delicious Hawaiian Sun Guava Jelly as a gift from my co-worker. She bought it at this local Hawaiian market in San Mateo called the Takahashi Market. 

Next I found some Green Tea Matcha Powder at our local Trader Joes. This can be purchased at almost any grocery store, just look in the tea or coffee section. If your Safeway or large brand grocer doesn't have it, check your local Whole Foods or equivalent store, they should have something very close. 

The rest is essentially following the typical French Macaron recipe:

Electric mixer (hand/stand mixer will do as long as you have a whisk and regular beater attachments)
Good heavy/thick baking sheets that won't warp in the oven
2-3 Silicone macaron baking sheets (I got these ones from Amazon and love them!)
Silicone spatula
Hand whisk
Kitchen scale
Set of mixing bowls
Sieve or flour sifter
Pastry bag and round tip with attachment

Shells Baking ingredients: 
100g Almond flour (I prefer Mama's Almond Flour Blend. It's much finer than other almond flour/meal)
200g Powdered/confectioner's sugar
40g plain sugar
2 tablespoons Green Tea Matcha Powder
3 egg whites at room temperature (approximately 100g)
Green Food coloring gel (optional)


After sifting the measured almond flour and powdered sugar together, I whisked in the green tea powder. Set the powder mix aside and you can separate the egg whites, add the pinch of salt, and whip the whites into a meringue. Just before they're reached their stiff peaks, I added a drop of green food coloring.  


Next you can start what is called the "macaronage" phase. To incorporate the dry mix into the meringue, you can put away your electric mixer, you will only need your silicone spatula. Add about 1/4 - 1/3 of the dry mix into your meringue bowl and begin to fold in the mixture. Scrape around the bowl and then press down, but be sure to make sweeping scrapes from the bottom up. You don't want to end up with a big dry glob on the bottom. Keep adding increments of the dry mixture and folding in between each addition. In the end, you should have a batter the texture of lava. **Again in this step it's important not to under-mix or over-mix the batter. It should be smooth with slow flowing ribbons when you pick up the spatula**

This is what your batter should look like when you've reached the ideal "lava" texture.

Next you can get to piping!

I also found this fun flower/star mold on Amazon as well! Fair warning, it's a little more tricky to pipe these ones, so if you're a beginning just stick to the rounds.


Let them rest at room temperature in the molds for 30 minutes. When the 30 min are close to up, start pre-heating your oven to 325 deg F. While it's pre-heating, you can whip together the filling!
Guava Buttercream Filling:
1 stick unsalted butter (softened/room temp)
250g powdered sugar
1/2 jar of Guava Jam (or your favorite jam to taste!)
1 drop of pink gel food coloring (optional)

Beat the soft or room temperature butter with your mixer until it's creamy and then you can start to add in gradual amounts of the powdered sugar. Once it's all incorporated, you can start adding in increments of the jam. I kept adding in heaping spatulas full of it until about half of it was mixed in. I added a single drop of pink gel food coloring to really enhance the flavor. 


Here's the final product before I spatulaed it into a piping bag and keeping it in the fridge before the shells were ready. Of course the final steps are the same as my Cookie Dough French Macaron post when you wait until they're completely cool, remove them from the silicone mats, and put them together with some yummy buttercream filling. 


 If you decide to give my recipe a try, leave a comment below or you can use #blissfullyevercrafter so I can follow along! Thanks for reading!

Blissfullly Ever Crafting,
Jennifer Lynn

 
site design by designer blogs